It’s been a long time since I posted a recipe, but I got so many recipe requests, I carved out some time to get this recipe on paper because I really hope you’ll all make it and show your friends and family just how amazing vegan cakes can be!!
As for the inspiration for this cake…
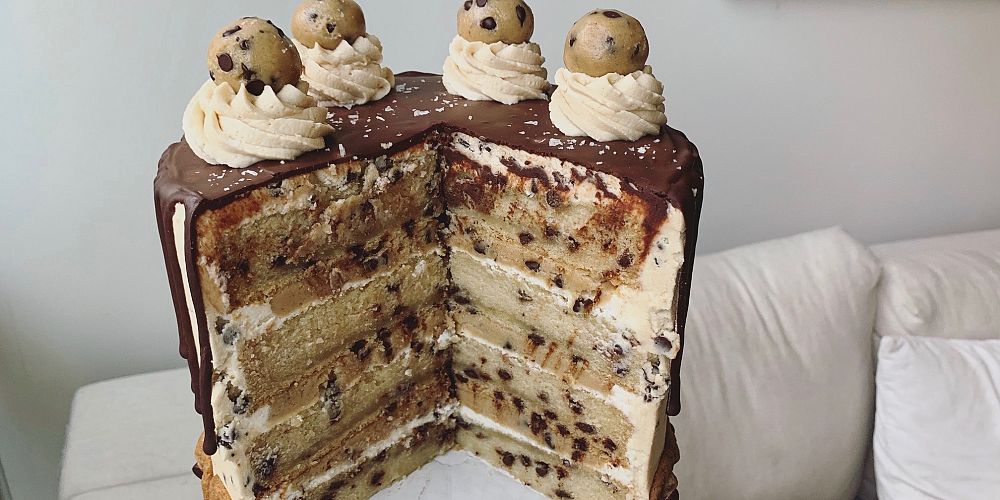
Growing up, my mom and I made chocolate cookies regularly. I remember eating the dough and thinking to myself, “this is SO DELICIOUS, it has to be good for me!” It definitely wasn’t, but it remains one of my most delicious memories. So, for her birthday this year, I made her this crazy, chocolate chip cookie dough cake using the (veganized) cookie dough recipe we used to use together. It was a hit!
One day (hopefully soon), I’d love to make and sell these out of the bakery, but for now, here’s the recipe so you can make it yourself. It is definitely a project. I recommend breaking things up and making all the elements for the cake over several days or even longer — this will make it a lot more manageable. For example, make the cookie dough ahead and store in fridge, bake the tiny cookies for the base, make the cakes and freeze). This will not affect the quality of the cake. Also, you may end up with leftover cookie dough and icing — it all depends how heavily you load this cake up.
I have re-read this recipe post 10x but please do let me know if you notice anything that looks wonky! Also message me if you have any questions (emails are best in emergencies ;)) — I’d be happy to help! Have fun making it and please tag me if you are sharing! Enjoy!
Ingredients
For the four 8″ cakes:- 4 1/2 c. plant milk (I used soy)
- 3 tbsp white vinegar
- 6 c. all-purpose flour
- 3 c. cane sugar (or white sugar)
- 3 tsp sea salt
- 2 tsp baking soda
- 2 tbsp baking powder
- 1 1/2 c. oil (I use canola or veg)
- 1/4 c. + 3 tbsp vanilla
- 3/4 c. mini dairy-free chocolate chips
- 1 c. vegan butter (room temperature)
- 1 c. vegetable shortening (room temperature…and if you don’t have any, more vegan butter will work)
- 6 c. icing sugar
- 6 tbsp plant milk (I used soy)
- 2 tbsp vanilla
- 1/2 tsp sea salt
- 1 c. vegan butter (room temperature) (I used Earth Balance)
- 1/2 c. vegetable shortening (room temperature)
- 3/4 c. light brown sugar
- 1 c. flour
- 5 c. icing sugar
- 1/4 c. + 2 tbsp plant milk
- 3 tsp vanilla
- 1/2 c. mini dairy-free chocolate chips
- 1/2 c. vegan butter (room temperature) (*updated – so sorry!)
- 1 c. cane or white sugar
- 1 c. brown sugar
- 2 tbsp vanilla
- 1/2 c. plant milk (I used soy)
- 1 1/2 c. all-purpose flour
- 2 tsp baking powder
- 2 tsp baking soda
- 2 tsp sea salt
- 1 c. mini dairy-free chocolate chips
- 3/4 c. (153g) chocolate chips (I used 58% dark chocolate)
- 1/2 c. (115g) plant milk (I used soy)
DIRECTIONS
For the four 8″ cakes:
*can be made ahead of time (defrosted cakes work well!)
- Preheat oven to 350F and grease your 8″ cake pans. Line the bottoms with parchment paper, if you like, for easy removal (I always do this because I’m terrified the cake will stick to the bottom of the pan then break when I try to remove it…your entire cake would be ruined!!)
- In a medium bowl, combine plant milk and vinegar. Give it a stir and let sit for ten minutes.
- In the meantime, mix together dry ingredients (flour, sugar, salt, soda, powder) in a large bowl.
- Once milk has curdled, stir in the oil and vanilla. Now add this wet mixture to your dry mixture and whisk together until there are no more lumps. Stir in the mini chocolate chips.
- Divide the batter evenly into your four cake pans. I like to weigh the batter (by pouring it into a separate bowl on a scale) and divide the total by four so I know exactly how many grams of batter each cake pan needs). This isn’t totally necessary, however, because you’ll be levelling the cakes off anyways.
- Bake cakes for 36 minutes (or until they are lightly golden and spring back when you touch) on the middle rack. Remove from oven and let cool for 15 before removing them from their pans and allowing to cool completely on cooling racks.
- Once completely cool, cut off the tops of the cakes with a cake cutter, if you have one, or a knife so they are totally flat and level (this will make for a more upright cake and a much easier time icing). You also need to trim off the edges / sides of the cake. Find a circular item that is just smaller than the diameter of the cake
For the vanilla buttercream:
*best if made fresh on the day you’re decorating your cake
- Add butter and shortening to your mixer and beat on high for two minutes. Lower the speed and gradually add the icing sugar, the plant milk and the vanilla. Beat until fully combined and perfectly smooth. Set aside (do not refrigerate).
For the chocolate chip cookie dough buttercream:
*best if made fresh on the day you’re decorating your cake
- In your mixer, cream together the butter and shortening with the brown sugar for a few minutes. Once fully smooth, gradually incorporate the icing sugar, flour, plant milk and vanilla. Once smooth, remove about a 3/4 cup of the icing and set aside. Stir the mini chocolate chips into the remaining batter in the bowl.
For the chocolate chip cookies:
*can be made ahead of time and stored in fridge in airtight container
- Preheat oven to 350F and grease a baking sheet. In a medium bowl, cream together both sugars with the butter using a mixer. Add vanilla and soy milk and set aside (it may curdle, but that’s okay — once you add the flour mixture it will look normal).
- If you’re worried about consuming raw flour, microwave it until it reaches 160°F or just microwave for one minute and 15 seconds on high, stirring every 15 seconds. If you’re not worried, skip this step.
- In a second medium bowl, combine the flour, baking soda, baking powder and salt. Now stir the dry into the wet. Add chocolate chips. Refrigerate the dough for at least 30 minutes (up to multiple days) to firm it up.
- Using a teaspoon, measure out tiny amounts of dough to make the tiny cookies that will circle the base of the cake. You’ll need about 1 tsp of dough per cookie — or go bigger if you like! Roll the dough into tiny balls with your hands and place on the cookie sheet at least two inches apart (or they will run into each other). Barely press down on the dough balls (you really don’t need to flatten them much). Feel free to add an extra chocolate chip or two on top of the dough. Make 16-20 cookies. Bake for 5-7 minutes. Let cool on a baking sheet for 10 minutes then transfer to a cooling rack or plate. When you remove, they’ll seem under-baked, but once they cool, they’ll firm up and get nice and chewy.
- Refrigerate the rest of your dough and save for the layers and the ball garnishes.
For the chocolate chip cookie dough discs / balls:
*can be made ahead of time and stored in fridge in airtight container
- Make the circular dough discs that will go between each layer of cake. Place a handful of dough on a silpat liner or something flexible that resembles plastic wrap. Please another layer of something that resembles plastic wrap (ideally plastic-free ;)) over top of the dough ball and roll it out with a rolling pin so that you can create a ~six inch circle (doesn’t have to be perfect). Eyeball it, or find a plate that’s roughly six inches and cut out your circle. Set aside and continue these steps until you’ve got your three dough discs.
- With the remaining dough, roll your balls with your hands. I used a scale and used 16g of dough per ball. You can definitely eyeball it though! Add chocolate chips to the exterior of your balls if none are visible. Refrigerate until you’re ready to garnish.
For the ganache:
*best if made fresh but you could re-heat if you make in advance
- Combine chocolate and plant milk in a small to medium micro-wave safe bowl (ideally one with high-ish vertical sides) and heat in microwave for 10 seconds. Remove from microwave and stir. Repeat these steps (microwaving and stirring) until your chocolate is melted and the mixture is completely smooth. Don’t worry if at first it looks weird and separated! It will come together. And if you find it too water every once it cools down, just add a little more chocolate and microwave/stir some more.
- Test whether it’s the perfect consistency to be dripped down the side of a cake by dripping some of the ganache on the inside of your bowl. You want to make sure it’s not too hot (which would cause the drips to hit the bottom and appear thin) and not too cold (which would cause the drips to be really short and chunky).
Assembling the cake:
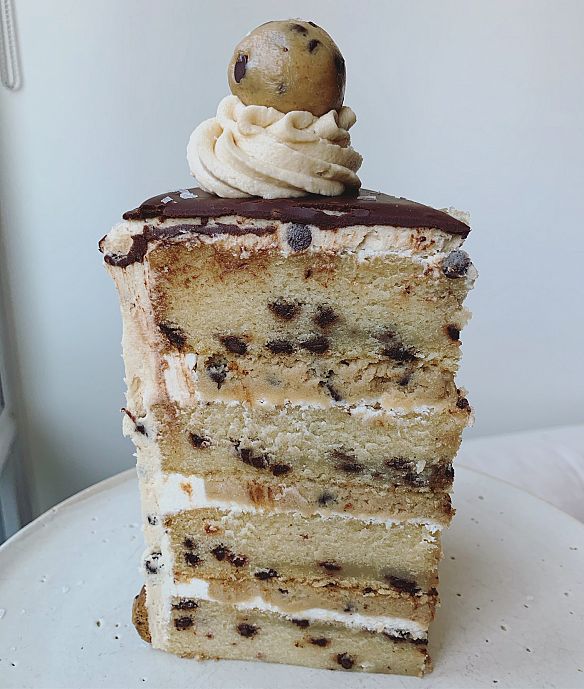
- Place your first layer of cake on your cake board (I like the white cardboard ones found at Michaels). Add a large dollop of vanilla buttercream to the center of the cake and spread it around evenly. With a small inverted spatula, create space for where you’ll be adding the circular layer of cookie dough by removing a little of the buttercream (my ‘dough discs’ were about 1.5″ smaller than the width of the cake). Place one of your rolled out cookie dough discs into that space.
- Repeat that step. Place your second layer of cake on top of the vanilla buttercream/cookie dough and add a similar-sized dollop of vanilla buttercream. Smooth it out, create the shallow grave for the dough, then add the dough. Repeat these steps again with your third layer of cake, then top that off with your fourth and final layer of cake. Crumb coat the entire thing (completely fill in all the holes (specifically the sides) with the vanilla buttercream and add the thinnest layer possible to the top and the sides of the cake. This will ‘seal in’ all the crumbs so they don’t mess up your final exterior layer of icing. Place in fridge for at least 30 minutes or overnight.
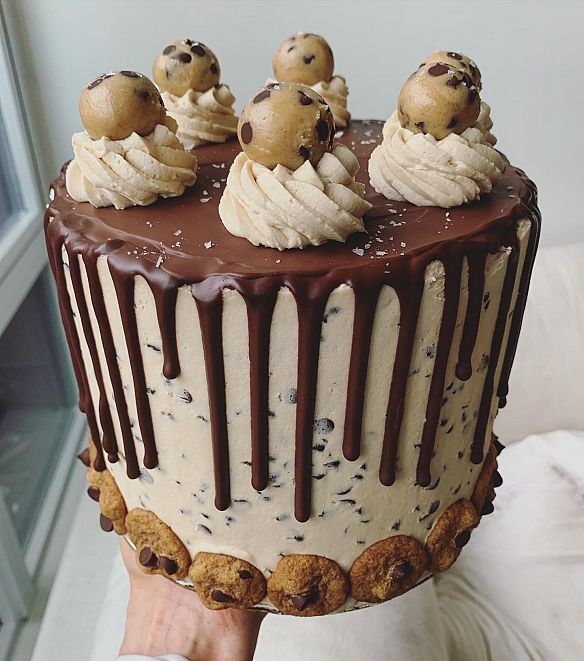
- Once your crumb coat is set, apply a thick layer of the cookie dough buttercream to the cake. Smooth down the sides and the top using a cake scraper (and ideally a turntable…if you are serious about cake making, they are a great investment! …got mine for $60 from Gourmet Warehouse). Quickly add your mini cookies around the bottom of the cake while the buttercream is still moist.
- Time to add the ganache. Transfer ganache to a small piping bag with a small opening (no tip — just a bag with the end cut off, about 8mm or so). Add your drips then add the remaining ganache to the top of the cake and smooth out with an inverted spatula. Place cake in fridge to cool.
- With the chocolate chip-free cookie dough buttercream that you reserved, add oversized dollops around the top of the cake. Add cookie dough balls to the top of each dollop and sprinkle the entire top of the cake with flaky sea salt. ENJOY!!!